|
Summary:
Buy your BackDrop
or
BackGround
early in your construction. Installation early makes the job easier,
however, finished layouts can be greatly enhanced by adding a backdrop.
Use our double sided tape for late installations. We continually hear from our
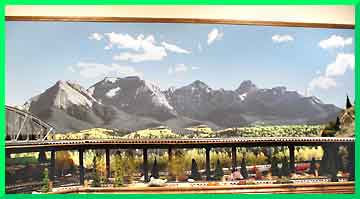
customers how realistic their layout looked after installing our backdrops.
After installing the backdrop, cover it with thin clear plastic to protect the
printed surface while developing your creation, then build your layout to blend
into the backdrop.
Super media - will lay flat, is easy to work with,
can be glued to a backing or wall, or stretched over a frame, is very flat (no shine), very
strong, water resistant, will not crinkle if dropped, and the printed
surface is somewhat protected. Be careful of self-adhesive products (we
don't sell them). One stick and they're up right or wrong.
|
 |
| Very Important:
Look at all scenes immediately after receiving them. Check
TRANSITIONS and sky matches and be sure all scenes go together as
expected. We seldom have a problem, but it can happen. We
cannot do much to help 30 days after the scenes are shipped or after they
are installed. |
|
Some notes:
- We have had nearly 100 %
satisfaction when installing our backdrops/backgrounds.
- The problems have been when
these recommendations were not followed.
- Be sure to have clean hands
- Although the paper is opaque, some white or black behind may show through,
also overlaps may show through. Check see-thru before pasting.
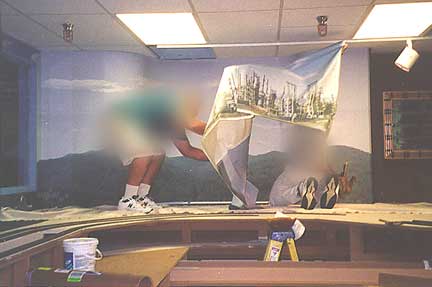
- If installing on existing
layouts and hanging vertically, have at least 3 people.
- Don't roll and push and roll
and push. The more you work it, the more bubbles you will have.
- This is not wallpaper and
does not go up like wallpaper. Send the wallpaper hanger home. However,
this job looked great when finished.
finished
- On seams and overlaps (A & B or
transitions), use the approximate middle of the 4 - 6 inch matching
overlap. Don't use the extreme edge of either. There may be
differences at the extreme edge.
- Stretch from all edges
and it will lay flat.
- The most common problem is putting A where
B should be. Plan ahead.
- Leave the backdrops in the same room for a
couple days to adjust to temperature and humidity.
- Rough percentage of install problems:
Wallpaper paste - 0.25%,
Tape - 0.5%,
Rubber cement - 0%, other methods - 0%.
- On humidity conditions of over 60%, the
media can swell slightly over time especially in areas of uneven stress.
This is noticeable when using tape and accounts for most of the tape
problems along with tape slippage. This has not been a problem with
wall paste or rubber cement.
- Finally, these scenes are
large. Unless you are looking at it with a magnifying glass,
no-one will notice a small bubble. They will see the entire layout
and scene and say, "awesome!".
-
|
FROM OUR RESEARCH
-
Use paste with the least water possible - Paste for
vinyl covering (clay based) is best.
-
We have heard of a waterless paste
Vinyl over vinyl (VOV). At least
one installation went well Other names are
Border over vinyl at about $10/quart.
-
Use minimum sealing on backing/wall. An oil based
sealer will cause the most problems.
-
You want enough sealing to prevent all the paste from
going into the wall, but not so much as to block the water in the paste
from going into the wall, forcing it into the backdrop.
-
Acrylic sealers are the best.
-
A tacky sealer like R35 from Roman Adhesives may improve
adhesion.
-
DO NOT USE GIBSON-HOMANS DYNAMITE
#785 paste
|
| TECHNICAL BULLETIN from media manufacturer of our SUPER
MEDIA Note: this is from the media
manufacturer, not us. There have been a very small percentage of customers
that disagree with the information given in this bulletin. Our
experience is that a very low water content paste is needed, put on
sparingly and the wall or board should not be sealed or lightly sealed so
the water can go back, not into the backdrop. This may not completely
agree with this tech bulletin. You would think the media (paper)
manufacturer would know best, but maybe not. In 99%+ of paste installations,
all goes well. We still like rubber cement or combination of rubber
cement and velcro the best.
INSTALLATION GUIDELINES
Wall Preparation:
* Wall should be prepped to a smooth, clean, and dry surface prior to installation.
Wall covering will not hide wall flaws such as:
nail holes, bumps, or dirt.
* Primer sealer should be used on unpainted drywall. Use acrylic wall covering
primers: Professional Ultra Prime (PRO-977),
Golden Harvest White Bite, or Allpro Ultra Prep 685. Priming provides a sound surface that
wall covering will adhere to. It is
recommended to strip down previous layer(s) of wall covering. The wall covering
may seem to be firmly adhered to the wall, but the
addition of another layer can cause adhesion failure.
* Prime over glossy paint with one of the above mentioned primers.
Paste Information:
* Clear adhesives such as Professional Ultra Premium Heavy Duty Clear Strippable (PRO-880), Golden Harvest GH-34 Clear
Strip-able, and Allpro Pro-Duty 3400 provide good adhesion and allow for easier stripping when the wall covering is to be removed
or replaced.
* Clay adhesives such as Professional Extra Strength (PRO-732), Professional Clay Strippable (PRO-774), Golden Harvest GH-40,
Allpro Extra Strength Vinyl 600, and Allpro Clay Strippable 661 have also been shown to be effective both during installation and
the removal of these wall covering materials.
* Pastes such as Professional Heavy Duty Clear PRO-838 or Allpro Clear Hang 610 have a more aggressive adhesion and should
be used for more permanent applications.
* Apply a coat of the adhesive using a 1/2� nap paint roller. Book for 10 minutes.
Hanging information:
* Do not use tape on imaged surface.
* Align top and adjoining edges. Smooth panels into place with a smoothing
brush or new paint roller, starting at the center of the panel working towards the edges.
End tech bulletin |
|
|
A note on overlaps
Overlaps for A - B or transitions are about 4 inches
with the same scene on both parts. Trim to about the middle.
Don't use the edge of either piece. Be sure to look carefully at
both and trim where they are the same. Put "A" on left
and "B" on right. You would be surprised how many
people put up a section only to find they put up the wrong one.
We recommend about 1/8 inch overlap, using rubber
cement to hold down the flap. We did not do well with butt
splices, however other people have had excellent luck mating a butt
splice. Suggest making a test first. We recommend a wavy
or irregular line. There can be slight differences in color due to
paper color and ink coverage. Sometime it is exact, sometimes a
slightly different shade. A straight line makes any variations more noticeable,
where an irregular line blends. You can also use EzKut
clouds to cover the seam.
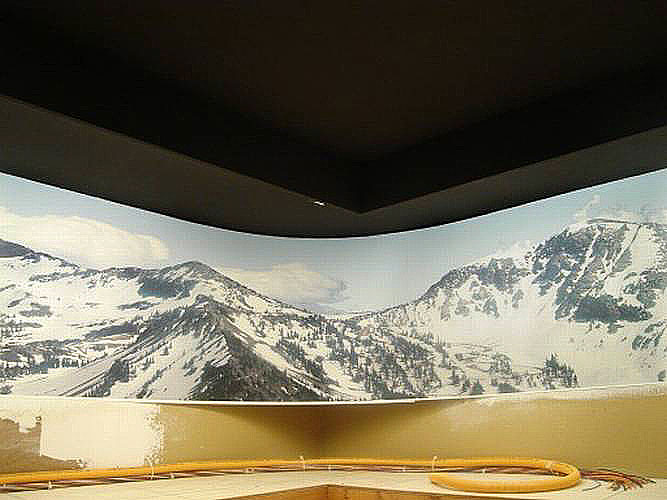
Paint Flat Black
|
You might
consider painting the ceiling above the backdrop flat black. |
|
 |
|
|
|
|
Recommended
Method
We are having excellent results with rubber
cement. Rubber cement has the following advantages:
1) Does not soak into the media and will not
cause expansion and distortions
2) Dries quickly
3) Very strong
4) Can be pulled off after dry
5) Does not hurt the printed surface
6) It doesn't smell bad
7) Use a "rubber cement eraser" to
remove excess after it dries and from print surface.
| One customer after having a bad experience with
wall paper paste suggested we remove paste as a method. |
| Another customer comment -
"Rubber cement is the only answer - absolutely beautiful!" |
|
Rubber Cement will
NOT work on white Styrofoam. It eats into the Styrofoam. |
|
The product to buy is available from Office Depot,
item# 200-132-407, Mfg# ROS233, 1 qt, $4.49, or Office Max,
item# 0701-1011, Mfg# 00232, 1 pint, $4.49. May be
manufacturer BORDEN or ELMERS. It can also be purchased from Lowes in
gallons.
Coverage is about 3 inch wide x 8 ft. = 1/4 pint (1/8
quart) that is 1.5 qt. / 36 in. x 12 ft with top, middle,
bottom, sides and 2 coats.
Procedure:
We recommend a strip across the entire top, across the
middle, across bottom, and up both sides, 3 inch wide on top and
1 to 3 inch middle, bottom, sides. The middle, bottom, sides are
to hold the backdrop against the wall, not for support. The backing
must be sealed or the cement will soak in, but not so smooth that the
rubber cement peels off. A glass-like backing may cause the cement not to
adhere and pull loose after dry. Put down a 3 inch strip on the
backing on top and 1-3 in middle, bottom, sides, where it will be fastened. You can brush it on but use a trowel or wide
flex knife to trowel flat. Do not pour into a bowl, leave in can
until ready to use, otherwise it will dry in the bowl. Allow to dry,
about 15 min. If it has soaked in and isn't tacky, put down
another strip. You need a solid base for the final layer to
stick to. We recommend a test on the backing to find out how much it
soaks in. You will need a noticeable somewhat rubbery coating
that will not peel off, before adding the final layer. If you can peel
off the sealing layer, or the sealing layer soaks in to nothing, your
backing is no good. Allow these layers to dry 15 min - 2
hrs. You may need only one layer depending on the backing
surface if the cement adheres well to the backing and backdrop.
Put down the final layer in about 1 ft sections (top,
middle, bottom) as you unroll backdrop. Trowel the cement flat but leave a little
thickness. The cement will dry in about 5 min so don't put down too
much. Press the backdrop into the cement using a clean new latex paint roller. Make perfect
before starting the next foot or so. Unroll and cement the backdrop in
small sections. The backdrop roll can be held in a roll with binder
clips (Office Depot item# 200-808-865). You will need some support of
the rolled up backdrop. Another person is helpful especially with 36 x
12. You may want to tape the top of the installed backdrop to temporarily hold the weigh and
support rolling to get flat, until the cement
dries. The backdrop will peel off and can be reset but as the
cement dries you will lose adhesion on repeated repositions. We
found it difficult to make test wrinkles, the media would lay flat when
rolled. We also found that when dry (2 hrs) adhesion was very
strong, easily strong enough for the top to hold the entire weight,
but could be carefully pulled off backing without damage (not
wallboard). After 24 hrs the top 3 inch strip can hold
many times the weight of the backdrop, and may or may not be able to
be removed without damage. Our test showed very strong adhesion
to most surfaces.
This may work well in curved corners as well since the
rubber cement dries quickly. Work 6 inch sections, roll flat, allow to
dry (5 min), work the next section without pulling on what was
done. We recommend practicing using any roll paper that is
porous.
Masonite tempered side worked with 2 coats
(sealing and final)
Photo wood panel front may not attach, but back side
worked well with 3 coats
Untreated wallboard worked with 2 generous coats. Will
pull the paper off wallboard when dry.
We recommend a test using ordinary writing paper, 20 lb copier
paper, or any rolled porous paper. If your paper sticks well, the backdrop
will also.
You might also consider
using rubber cement on the top 3-5 inch horizontal strip, a small
occasional narrow strip in the middle (to hold middle to wall) and
velcro on the bottom. This will allow for adjustment if
there are wrinkles in the future. Use rubber cement to attach the
velcro to both surfaces. This is a good technique in moist
summer climates.
EMail:
((SUBJECT=BACKDROP))
| For a
detailed graphic, "How to use rubber cement on existing
layout" click
here |
| |
| For a
detailed graphic, "How to build a frame and curved
corners" click
here |
| For a
detailed graphic, "How to seam using rubber
cement" click
here |
| For a
detailed graphic, "How to install a backdrop on existing
layout" click
here |
|
Using mirrors |
|
|
|
| Additional installation information under backdrops and
other articles. |
|
|
Tape It!
|
Carpet tape can be used.
1) Mark the outline of where
the backdrop will go on the surface (wall, masonite, frame,
etc). Be sure the lines are straight, level, and
square. Smooth sealed surfaces are best, but untreated
wallboard will work.
2) Put the tape on the wall
or masonite about 1/4 inch inside the line. Cover the entire top
plus 50% on a second layer. Use double on curves. We
have increased coverage because of slippage reported under some
conditions. Be sure the surface is varnished or painted on
Masonite. There have been reports of pulling the surface off
untreated Masonite. Do not put tape on the
first 24 inches on one end (the transition or overlap end).
Leave the protective paper cover on the tape. Press the tape
lightly into the wall.
This tape can be pulled off the backdrop one time without doing
damage if not pressed in hard, and pulled off some surfaces like
Masonite one time, although pulling off decreases the
adhesive. If put on untreated wallboard it will pull off the
wallboard surface and destroy both the wall and tape. It is
ok to put on untreated wallboard, just don't pull it off.
3) Put tape along the sides and bottom, about 1/4
inch inside the line. Cover about 30% on sides and bottom.
Leave the protective tape on.
4) Prepare the backdrop as necessary (trim border,
cut to size, etc.).
5) Peel the protective paper from the top tape
only.
6) Temporarily mount the top corner or hold in
place solidly the corner without the tape (overlap
end). This is the starting point. Be sure it is
right. Stretch the top to the other end making sure the top
is along the line and start away from the wall moving toward the
wall until the backdrop touches the tape (do not press). The
tape will grab the backdrop so move slowly the last 1/4 inch and
be sure you are on the line.
7) If you have the people, check midpoints and pull
up as necessary. Lightly press small hold points along the top.
8) When you are sure the backdrop is the way you
want, press the backdrop into the tape using a clean board of
about 24 inches long.
9) Add the 24 inch section at the starting point,
remove protective tape, stretch top and press in.
10) Peel the protective paper from the sides and
bottom tape while holding the backdrop away.
11) Pull both bottom corners of the backdrop down
and out to stretch flat.
12) Press into the tape starting from the bottom
middle working toward both ends.
For existing layouts:
1) Put the tape across the entire top of the backdrop.
2) Add occasional tape as needed on bottom and sides,
leave protective paper on
3) Remove the protective paper from top
4) Pick up backdrop and slide behind layout
5) Push in tape on one end, pull top tight and
straight (several people may be required)
6) Push in remainder of tape at top
7) Pull flat at bottom and sides
8) Remove protective paper on additional tape and push in
| We have had two complaints involving
creep on carpet tape over several months. The creep is between the
tape and mounting surface, not tape and backdrop. This
causes bulges in the middle and sides. One was on Masonite
and one on a painted wall. Both were at temperatures over 75 deg.
Tape can pull the surface off weak tempered or un-treated
Masonite. We recommend paint or varnish to make a solid
surface. Temperatures over 75 deg may allow the
adhesive to slip. |
|
|
|
Use Velcro
Put strips of Velcro across the top, sides and bottom. Velcro can
be fastened using rubber cement or double sided tape. Has the
advantage of holding well but can be removed and repositioned at any
time. Use a generous amount across the top. You can also
use a combination of rubber cement or double sided tape for areas
that are not accessible and Velcro for areas that are accessible to
allow repositioning later if there are wrinkles. |
|
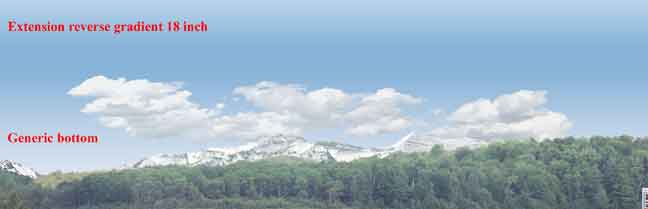
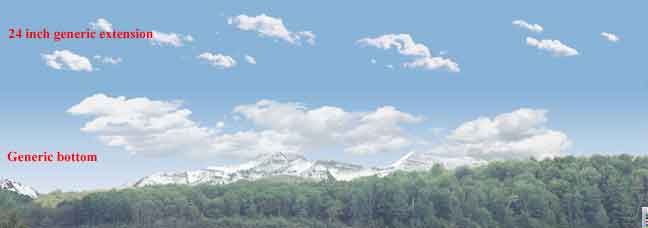
More than 36
inches high to 83 inch in 2 pieces
You can add a clouds and sky extension. Use any cloud scene
and indicate it as an extension and we will make the sky a solid
blue the same as the top of the scene below. Example shown
below as 24 inch generic extension. We need to know
the stock number of the clouds and sky and the stock number of the
scene it is going above. Example CL CS 179EX
continue
to sky&clouds group
Another option is to use the reverse gradient extension.
Advantages are that it avoids redundant clouds, blends into ceiling
lighting, looks like overhead haze and avoids one cloud directly
above another that can occur with stacking clouds. Examples
shown below 18 and 36 inch extension. Stock #CL CS
EX
Be sure to install the right extension over the right bottom and
don't cut more than 1/8 inch off the top of the bottom scene.

 |
Install Method 3
We recommend first building
a backing using 1/8 inch Masonite or the like. Cut to the size
of your backdrop 18, 24, 36 inch high/8, 10, 12 ft long. Use 1
x 2 or 1 x 4 pine strips to fasten Masonite panels together for
a 10 or 12 ft length. If you are using A and B extended scenes,
leave a 4 inch overlap of the backdrop beyond the backing panel
on the side of the scene seam. Plan ahead which section will have
the on-top flap.
Plan carefully where the Masonite
backing panel will go on your layout and mark on the panel where
the backdrop will go. You don't want to move the backdrop once
it has been glued. Practice stretching the backdrop to remove
wrinkles. Use packing tape to stretch the backdrop and remove
waves before you glue. A planning mistake can be costly.
Remove the backdrop from the
backing panel or wall and spread quality premixed wallpaper paste (or vinyl
paste - no water*) on the backing
panel or wall inside your marked line or on most of the surface if the
panel is the exact size. Spread paste very thin.
Any lumps will show through and may distort the backdrop. Also a well sealed or
painted surface may cause the water in the paste to come out through the
backdrop causing bubbles. Put it on very thin. You might practice gluing on scrap
first. We used heavy duty clear 2 inch packing tape, scotch (or similar
brand), to stretch the backdrop. The tape is removed after the
backdrop is glued or stapled. Fasten the tape to the end away
from the overlap (if you have one) and secure to the backing panel
by wrapping around behind (end
one). Leave several inches
of the excess length on the backdrop to fasten the tape. This
end should be securely and evenly fastened to the backing panel. Don't put the tape on
the printed surface. Use the white border or attach to back then reverse
another tape (sticky to sticky) for a backward facing adhesive. Cut off
exposed tape after the paste dries (24 hrs).
On the other end (end two), fasten packing tape to the back side of the backdrop and reverse
(sticky to sticky) then stretch the backdrop across the panel. Fasten tape on the
front (ink side) only is it will be trimmed off later. Apply most
of the stretch horizontally to the top and bottom of the backdrop pulling in
the long dimension. Plan ahead to fasten end two securely.
Add tape along the top and bottom to pull in the short dimension (vertically) as necessary to remove all waves. You may have to retention each
pull location to remove all wrinkles.
You may have to temporarily
extend the backing panel if you need to stretch on the front as
opposed to wrapping over the edge.
If using paste or spray, use
a NEW clean, very
dry and round latex
paint roller to roll the backdrop flat into the paste. Resist
the urge to roll, and roll, and roll. The more you roll the more damage you may
cause. If stretched properly, rolling is almost unnecessary.
You are lightly pressing the backdrop into the glue, one time.
Waves should be removed by stretching , not rolling.
After the paste is completely
dry (24 hrs), trim off excess backdrop and remove the tape, leaving
the A/B flap (if you have one) at 1/4 to 1/2 inch. Mount the backdrop on your layout
and position the A/B flap over the other scene. You can double
stick or glue the flap to the other scene (rubber cement works well) or trim both flap and
matching scene for a butt splice. We have had better luck with an overlap
rather than a butt splice. If you use rubber cement, wait until dry then
roll off excess.
|
A customer comment
Just
wanted to let you know that I am absolutely thrilled with your product. I am
working on a new layout and just hung your Seven Springs Rt.31 backdrop. I
purchase two 12 foot x 42 inch transitional scenes. I have a 14 foot wall
and a 7 foot wall forming an l shape. I primed the new walls with an acrylic
primer. I then used a vinyl heavy duty clay paste. I applied a thin coat of
paste and booked it ,letting it dry for 10 minutes. A friend and I hung it
,rubbing out any bubbles with a plastic straight edge ,which had rounded
corners. The transitional piece was added at the seam utilizing the
traditional cut and butt method.
The entire process was completed in less than one hour
and the job came out PERFECT.. I would recommend that this be the only
process utilized for installation. Thanks again for a truly great product.
Please feel free to utilize this information as a testimonial and
installation instructions. |
*Another way:
One of our professional custom layout
builders used vinyl wallpaper paste (no water) and a new plastic smoother to
very carefully squeegee the surface like wallpaper. Result,
excellent. We are testing vinyl paste, but the results may vary depending
on the backing.
|
For
a detailed graphic "How To Curved Corners"
click
here
|
Method 4
Build a frame and stretch the
backdrop over the frame with or without a backing. Use 1 x 2 and
1 x 4 pine and support as necessary - make it strong. Staple the
backdrop over the lip and use many staples to distribute the stretch.
On super media the packing tape along the edge will strengthen
ends and reduce the chance of ripping. Use the packing tape to
stretch the media and remove all waves before you staple. Advantages
are: less damage to the backdrop (no glue), lower weight and less
chance of ripples.
Method 5
Mount on the wall using method 1 (without the masonite). Will be a little more difficult to stretch
and you will need several people. Be sure the surface is flat.
For TRANSITIONS:
About 4 inches will be the
same on both halves. Trim to about 1/8 inch overlap either straight or
irregular. Your choice on which to overlap (put overlap away from
light source). Use rubber cement to hold down the flap. Wait 24 hours to rub
off excess, but try to get as little on printed surface as possible.
You are only holding 1/8 inch, not the entire weight. Butt splice not
recommended.
|
New Products
For curved corners we are trying FRP panel
(bathroom shower wall panel) about 1/16 thick, very flexible, about $25
4x8. Adhesives yet to be tested. Also a customer used bending plywood
(3/4 inch thick) for curves, available on special order from lumber
yards.
Adhesives: 3M 6091 never dries adhesive.
Is supposed to let you peel off the backdrop after years.
PLASTI-KOTE - A waterproof coating. This
coating improves waterproofing and has no visible effects, shine, etc.
There may be other products that work the same under different names. We
do not sell this or other waterproofing products. We do not guarantee
this or any other waterproofing spray and have no data on long term
effects. We recommend not using a spray unless absolutely needed and
then test first. Long term effects are unknown! |
DO NOT GET THE FRONT DIRTY
and reduce heavy water contact
Cover the backdrop with clear plastic when doing
serious benchwork.
Important:
If you plan to store the
backdrop for more than 2 weeks rolled up, store in the shipping tube standing on
end. Laying horizontal may cause the roll to flatten and require time
rolled out on a flat surface to become flat again.
|